
如何在 Windows 上安装 Laravel Homestead
:cn: 要安装好honmestead有8个步骤
-
首先你首先要确定你有个好的 terminal [ 终端:cmder 或 Git 的git bash ] .
注意windows的cmd不能用 -
下载和安装 [ virtualbox ] 和 [ vagrant ]
前者为系统装载用的,后者为系统控制用的 -
如果你要使用 homestead 就必须要有个
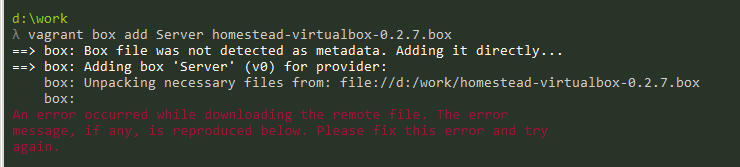
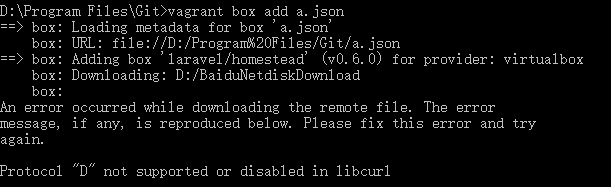
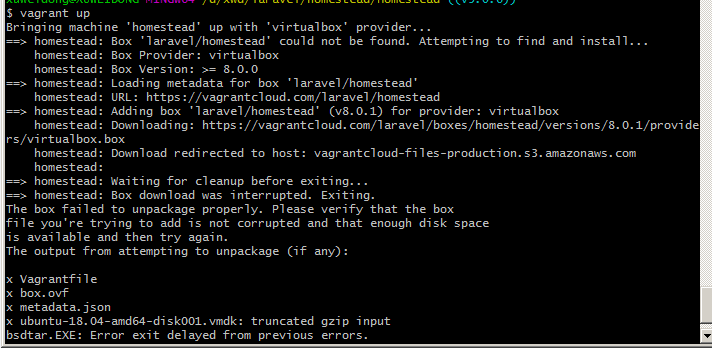
virtualbox.box的文件 ,官方 Laravel 下载这个文件的这个命令为vagrant box add laravel/homestead但是因为中国的对外国网络资源的限制,你要下载这个文件可能会需要不少的时间
因此 , 在这我们拥有两个选择的余地- 选择一 : 当你使用官方下载命令时,你的终端会显示这个文件的源地址复制,然后按 ctrl +c 退出,然后用的喜欢的下载软件下载.
- 选择二 : phphub上的 virtualbox.box
-
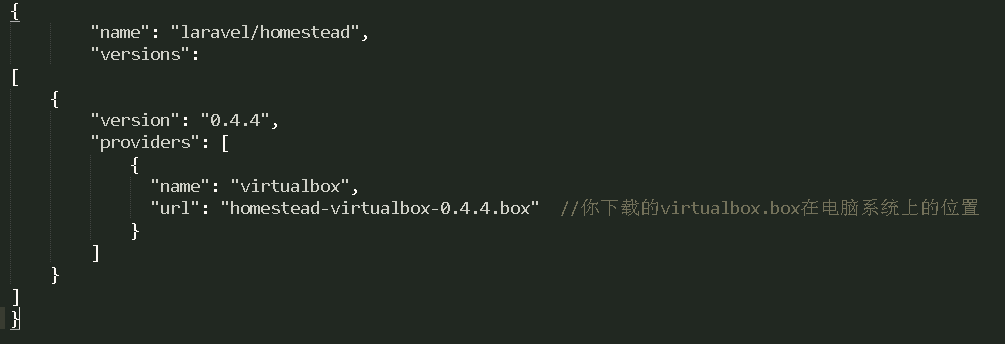
好了 , 现在我假设你已经拥有这个文件,现在来用我们的方法添加
virtualbox.box.
打开你的ide(代码编译器) ,一般为 Sublime Text 和 Atom ,为何要提编译器呢 , 因为下面的步骤可能会需要其中一个的编译器 , 创建一个名为a.json的文件 , 输入以下内容 :arrow_down: -
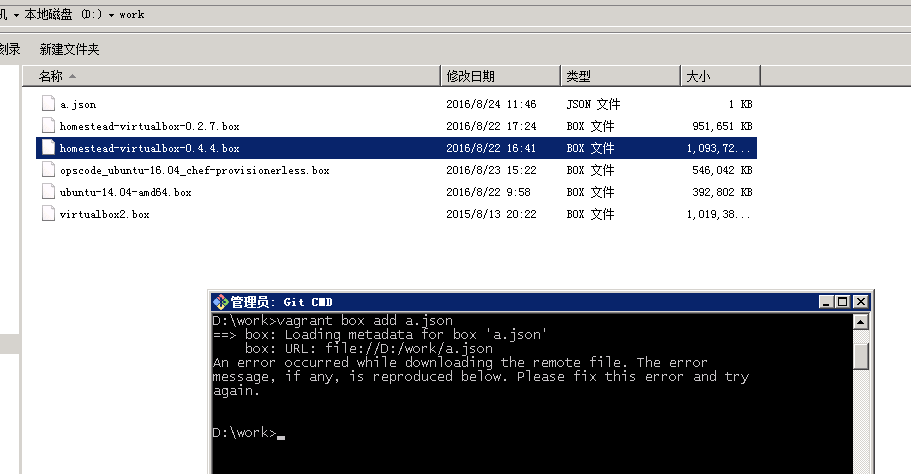
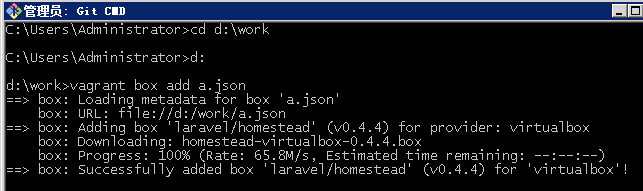
现在继续
在terminal ( 终端 )输入. -
注意 !!!现在这个步骤很重要好了现在用IDE(代码编译器)打开目录地址 C:\Users\windows的账户名\ .homestead\Homestead.yaml , 你会看到如下代码|--- | ip: "192.168.10.10" |memory: 2048 |cpus: 1 |provider: virtualbox | |authorize: ~/.ssh/id_rsa.pub | |keys: | - ~/.ssh/id_rsa | |folders: | - map: ~/Code //这个是你的项目的地址,例如D:\随便\项目的目录 1 | to: /home/vagrant/Code //这个是homestead系统的地址 2 | //其实这就是windows和hometead两个系统共享一个文件夹,难懂一点的话叫||映射 | |sites: //__这个是你的项目 | - map: homestead.app 这个是你项目要设定在你的浏览器上的地址 //需要设定C host文件 | to: /home/vagrant/Code/Laravel/public //这里的Laravel其实就是D:\随便\项目的目录\Laravel | |databases: | - homestead | |# blackfire: |# - id: foo |# token: bar |# client-id: foo |# client-token: bar | |# ports: |# - send: 50000 |# to: 5000 |# - send: 7777 |# to: 777 |# protocol: udp将以上的代码修改成以下的代码
|---
|ip: "192.168.10.10"
|memory: 2048
|cpus: 1
|provider: virtualbox
|
|authorize: ~/.ssh/id_rsa.pub
|
|keys:
|   - ~/.ssh/id_rsa
|
|folders:
|    - map: D:\随便\项目的目录        //当启动时会自动转换成D:/随便/项目的目录,这个是正确的
|      to: /home/vagrant/Code
|
|sites:   //看到这你可以看到为什么是sites,而不是site
|    - map: aimiliya.local                 这个是你在hosts设定的网站地址
|      to: /home/vagrant/Code/king/public  这里的king是你设定的D:\随便\项目的目录\king
|
|    - map: lamu.local
|      to: /home/vagrant/Code/lamu/public
|
|    - map: leimu.local
|      to: /home/vagrant/Code/leimu/public
|
|
|databases:
|    - homestead
|
|# blackfire:
|#     - id: foo
|#       token: bar
|#       client-id: foo
|#       client-token: bar
|
|# ports:
|#     - send: 50000
|#       to: 5000
|#     - send: 7777
|#       to: 777
|#       protocol: udp
|
提醒 : IDE(代码编译器)记得保存 .警告 :以上代码为最基础的Homestead配置 ,你要进行开启其他功能最好阅读或参考 Laravel 和 vagrant官方文档举例 :例如在 folders 下面填写 type:“nfs” , 这对于windows 来说是错误的 , 对于 mac 来说却是成功的 , 原因vagrant不支持对 windows 开启 nfs ,具体参考 synced-folders . -
.好了现在回到
terminal ( 终端 )启动吧,输入vagrant up注意 :在你以后重新启动Homestead .
即 :vagrant up都必须在 Homestead 这个目录下启动C:\Users\windows的账户名\Homestead> vagrant up Bringing machine 'default' up with 'virtualbox' provider... ==> default: Checking if box 'laravel/homestead' is up to date... ==> default: Clearing any previously set forwarded ports... ==> default: Clearing any previously set network interfaces... ==> default: Preparing network interfaces based on configuration... default: Adapter 1: nat default: Adapter 2: hostonly ==> default: Forwarding ports... default: 80 (guest) => 8000 (host) (adapter 1) default: 443 (guest) => 44300 (host) (adapter 1) default: 3306 (guest) => 33060 (host) (adapter 1) default: 5432 (guest) => 54320 (host) (adapter 1) default: 22 (guest) => 2222 (host) (adapter 1) ==> default: Running 'pre-boot' VM customizations... ==> default: Booting VM... ==> default: Waiting for machine to boot. This may take a few minutes... default: SSH address: 127.0.0.1:2222 default: SSH username: vagrant default: SSH auth method: private key ==> default: Machine booted and ready! ==> default: Checking for guest additions in VM... default: The guest additions on this VM do not match the installed version of default: VirtualBox! In most cases this is fine, but in rare cases it can default: prevent things such as shared folders from working properly. If you see default: shared folder errors, please make sure the guest additions within the default: virtual machine match the version of VirtualBox you have installed on default: your host and reload your VM. default: default: Guest Additions Version: 5.0.20 default: VirtualBox Version: 5.1 ==> default: Setting hostname... ==> default: Configuring and enabling network interfaces... ==> default: Mounting shared folders... default: /vagrant =>C:/Users/windows的账户名/Homestead default: /home/vagrant/Code => D:/随便/项目的目录 //当你没看到这条信息请返回你的Homestead.yaml设定 ==> default: Machine already provisioned. Run `vagrant provision` or use the `--provision` ==> default: flag to force provisioning. Provisioners marked to run always will still run.好了,这算启动成功了,但是配置成功了吗?还不能确定的,输入
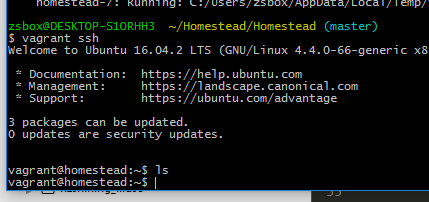
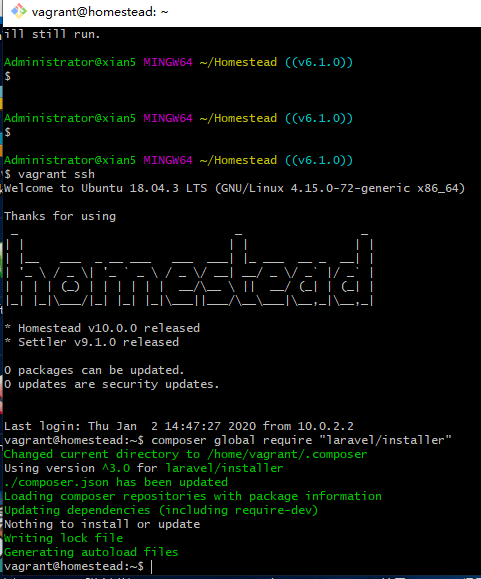
vagrant ssh登入homesteadC:\Users\windows的账户名\Homestead> vagrant ssh Welcome to Ubuntu 16.04 LTS (GNU/Linux 4.4.0-22-generic x86_64) *Documentation: https://help.ubuntu.com/ vagrant@homestead:~$ //当看到这个说明登入成功了 vagrant@homestead:~$ ls //查看下一级目录 ,有Code,可以安心 Code vagrant@homestead:~$ cd Code vagrant@homestead:~/Code$ ls //当看到king了,你可以彻底放心了,配置成功了 king提醒 :如果你启动了 Homestead , 你发觉你的配置文件Homestead.yaml :想要修改 , 可以的使用命令:vagrant up --provision ,此命令必须在Homestead 启动后使用,此命令作用为更新Homestead.yaml的修改 -
最后要在浏览器上显示你的网页你必须设定对应的hosts .
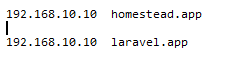
hosts文件所在在目录:C:\Windows\System32\drivers\etc\hosts| |# Copyright (c) 1993-2009 Microsoft Corp. |# |# This is a sample HOSTS file used by Microsoft TCP/IP for Windows. |# |# This file contains the mappings of IP addresses to host names. Each |# entry should be kept on an individual line. The IP address should |# be placed in the first column followed by the corresponding host name. |# The IP address and the host name should be separated by at least one |# space. |# |# Additionally, comments (such as these) may be inserted on individual |# lines or following the machine name denoted by a '#' symbol. |# |# For example: |# |# 102.54.94.97 rhino.acme.com # source server |# 38.25.63.10 x.acme.com # x client host | |# localhost name resolution is handled within DNS itself. |# 127.0.0.1 localhost |# ::1 localhost | |192.168.10.10 aimiliya.local |192.168.10.10 lamu.local |192.168.10.10 leimu.local然后把刚复制到桌面而且修改好的hosts文件的拖回C:\Windows\System32\drivers\etc\hosts覆盖.
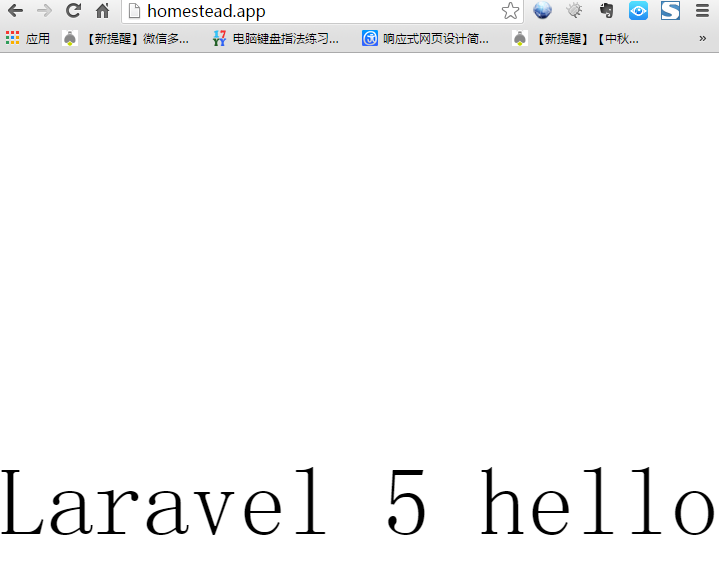
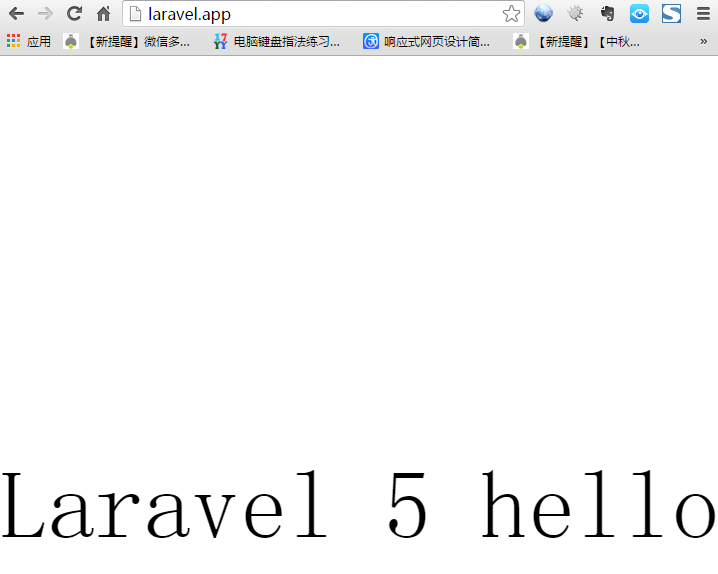
注意:直接修改是不行的好了,这就是最后的配置了,请开心的进行Laravel开发吧 !!!
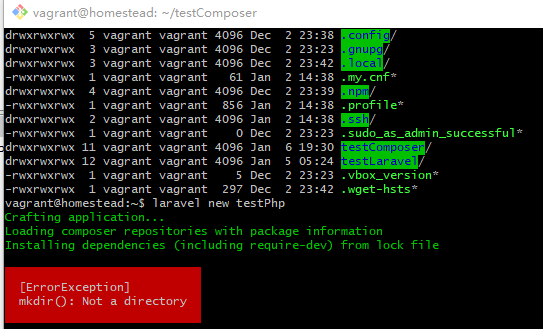
新增问题 1 :
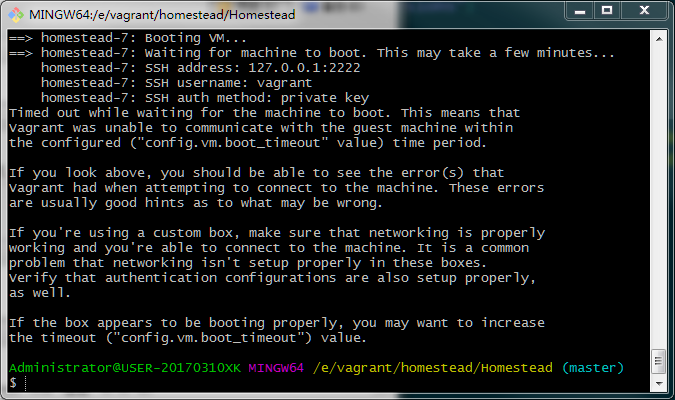
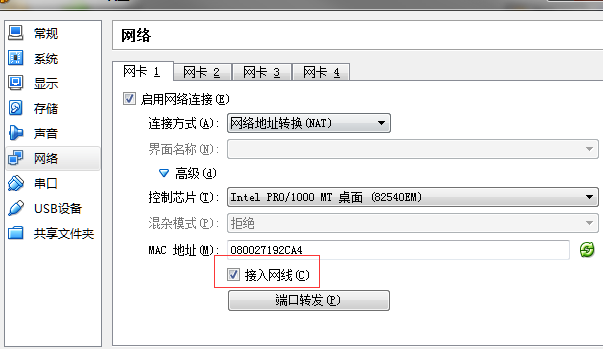
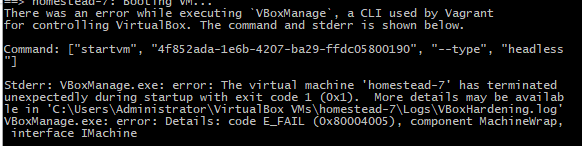
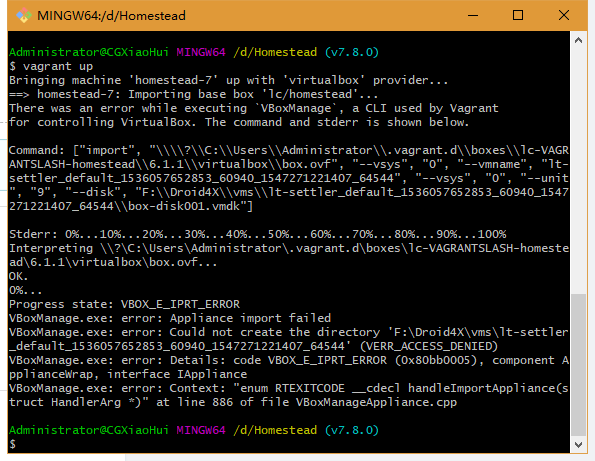
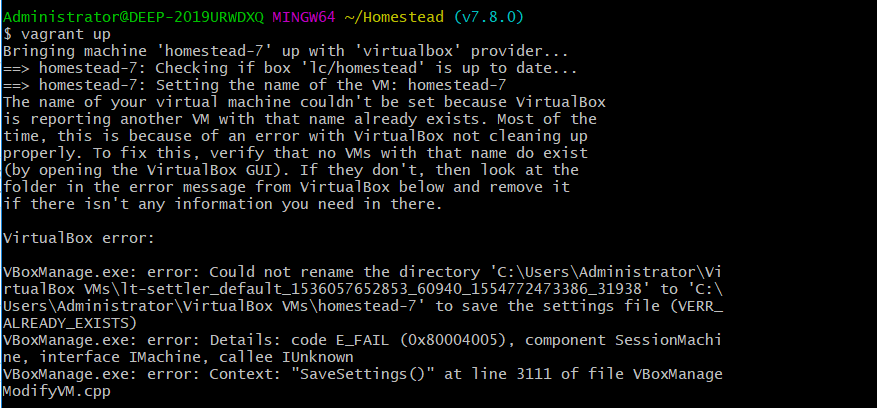
关于vagrant up停顿在以下的画面 :请参考链接Timed out while waiting for the machine to boot. This means that Vagrant was unable to communicate with the guest machine within the configured ("config.vm.boot_timeout" value) time period. If you look above, you should be able to see the error(s) that Vagrant had when attempting to connect to the machine. These errors are usually good hints as to what may be wrong. If you're using a custom box, make sure that networking is properly working and you're able to connect to the machine. It is a common problem that networking isn't setup properly in these boxes. Verify that authentication configurations are also setup properly, as well. If the box appears to be booting properly, you may want to increase the timeout ("config.vm.boot_timeout") value.
留言 :
对于尝试成功的朋友在下面回复留言成功,以便更多的网友知道此方法,
不成功的请用 markdown贴出错误的地方
要转载的话来源标记为PHPHub就行了,这个是给PHPHub的礼物了:relaxed:
实在有不明白的此帖隐藏有我邮箱,发信件到我邮箱就行了 .
本帖已被设为精华帖!
本帖由 Summer
于 7年前 加精


 关于 LearnKu


推荐文章: